Your roof silently protects everything you value in your home, yet it's often the most neglected part of the house until a problem appears. Regular DIY maintenance can add years to your roof's life while saving thousands in potential repair costs. What specific warning signs should you watch for each season? How can simple afternoon projects prevent major headaches down the road? This guide will walk you through practical, safety-conscious approaches to roof care that balance your time investment with significant returns.
The difference between a 15-year and a 30-year roof lifespan often comes down to consistent, informed maintenance rather than the materials themselves. We've compiled essential seasonal inspection strategies, early problem identification techniques, and step-by-step maintenance procedures that any homeowner can master. You'll discover which tasks are truly DIY-appropriate and which warrant professional attention, along with how proper roof care directly impacts your monthly energy bills. With these practical tools, you'll gain both the knowledge and confidence to protect one of your home's most valuable assets.
Seasonal Inspection Strategies: Your Roof's Year-Round Calendar
Creating a consistent inspection routine tailored to your specific roof type can prevent minor issues from developing into major problems. Different roofing materials respond uniquely to seasonal changes, requiring customized approaches to maintenance. For asphalt shingle roofs, focus on granule loss and cracking issues quarterly. Metal roofs benefit from bi-annual inspections checking for loose fasteners and surface scratches. Tile and slate roofs should be examined after severe weather events to identify any displaced or cracked pieces that could lead to water intrusion.
Developing your personalized roof inspection calendar starts with understanding your local climate patterns. In regions with heavy snowfall, schedule additional winter inspections. Areas prone to hurricanes or high winds require post-storm assessments regardless of your regular schedule. Document your roof's current condition with dated photos from consistent angles to track subtle changes over time. This visual record becomes invaluable when determining if a new issue requires immediate attention or can safely wait for routine maintenance.
Spring inspections should focus on identifying damage from winter's freeze-thaw cycles and heavy snow loads. Check for loose, curled, or missing shingles that may have been weakened by ice and wind. Examine your attic for signs of water intrusion or inadequate ventilation that could lead to condensation problems. Pay special attention to roof valleys and penetration points like chimneys and vents where winter moisture may have compromised seals. Early spring is also the ideal time to clean winter debris from gutters before heavy spring rains test your drainage system.
Summer maintenance prioritizes protection against UV damage and heat-related stress. During warmer months, inspect for shingles that are buckling, warping, or showing excessive granule loss from intense sun exposure. Check roof-mounted equipment like satellite dishes or solar panels to ensure their attachments remain secure and weatherproof. Summer is also the perfect time to trim back overhanging branches that could damage your roof during storms or drop excessive debris. Examine attic temperature during peak heat to verify proper ventilation is preventing heat buildup that can warp rafters and reduce shingle lifespan.
Fall preparation focuses on creating clear pathways for winter precipitation to drain properly. Beyond basic gutter cleaning, check downspouts for proper water flow and ensure they direct water away from your foundation. Inspect and secure loose flashing around chimneys, vents, and skylights before winter weather tests these vulnerable areas. Remove any accumulated organic matter like leaves and pine needles from roof valleys and low-slope sections where moisture retention could lead to rot. Fall is also the ideal time to check your attic insulation levels to prevent heat loss and ice dam formation in the coming winter.
Winter monitoring requires vigilance without necessarily climbing onto icy roofs. Use binoculars from ground level to check for ice dam formation along eaves, particularly after freeze-thaw cycles. Watch for excessive snow accumulation that exceeds your roof's load-bearing capacity, especially on older homes or in areas with wet, heavy snow. Monitor interior ceilings for new water stains that might appear during winter, indicating roof leaks that require attention when conditions allow for safe repairs. Document any concerns for follow-up when weather permits safer roof access.
Early Warning Systems: Identifying Problems Before They Escalate
The most reliable roof warning systems often exist inside your home, not on the roof itself. Conduct monthly attic inspections with a flashlight, looking for subtle moisture patterns on underside roof sheathing. Pay particular attention to areas around roof penetrations and valleys where leaks typically begin. Even minor water stains warrant investigation, as they often appear far from the actual roof breach point due to water traveling along rafters. Check attic insulation for compression or discoloration, which indicates potential roof leaks that haven't yet penetrated your ceiling.
Ceiling discoloration provides critical information about your roof's condition when properly interpreted. Yellow or brown stains typically indicate slow, persistent leaks that allow water to saturate building materials gradually. Darker, mold-spotted stains suggest ongoing moisture issues that may involve both roofing and ventilation problems. The pattern of ceiling stains can help pinpoint the source—rings that grow concentrically often indicate periodic leaks around plumbing vents, while straight-line stains frequently correspond with roof valleys or ice dam formation. Document these patterns with dated photos to track their progression and help professionals diagnose the underlying cause.
Your gutters contain valuable diagnostic information about your roof's condition. During cleaning, pay attention to what you're removing:
- Black granules from asphalt shingles: Normal in small amounts but concerning in large quantities, indicating advanced shingle deterioration
- Rust particles: May suggest metal flashing failure or deteriorating fasteners
- Small pieces of wood: Could indicate fascia board rot or deteriorating roof decking
- Shingle fragments: Direct evidence of roof material failure requiring prompt attention
- Pine needles and seeds: May cause damming in gutters and accelerated shingle wear
The presence of granules in gutters and downspouts requires careful interpretation. New roofs naturally shed excess granules during their first year—this is normal and not concerning. However, older roofs losing significant granules indicate advanced deterioration of the protective surface layer. Areas with bare asphalt showing through have dramatically reduced weather resistance and UV protection. Pay special attention to granule loss patterns—uniform distribution suggests general aging, while concentrated areas may indicate improper installation or manufacturing defects that could void warranty coverage.
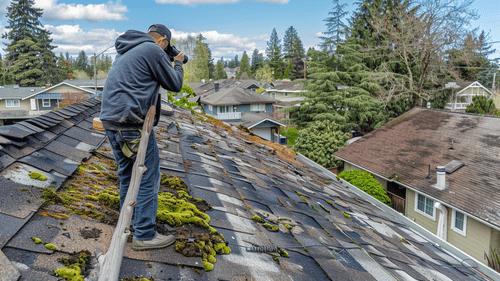
Moss and algae growth represent different levels of concern depending on your roof type and climate. In humid regions, black streaks (typically algae) are primarily a cosmetic issue on asphalt shingles but can reduce their reflective properties and slightly shorten lifespan. True moss growth, however, creates moisture-trapping pockets that prevent proper drainage and accelerate deterioration. On wood shake roofs, any biological growth is concerning as it accelerates decay. For tile roofs, moss may not damage the tiles themselves but can compromise water flow patterns and create damming issues. Document growth patterns seasonally to determine if the problem is worsening and requires intervention.
Smartphone photography provides a powerful tool for tracking subtle roof changes over time. Establish consistent photography positions and angles during each inspection, creating comparable images that reveal gradual deterioration. Use your phone's timestamp feature to maintain chronological records. When photographing potential problem areas, include reference objects for scale—a coin placed near a crack or separated seam helps document whether the issue is expanding over time. Create separate photo folders for each roof section to better organize your monitoring efforts. These visual records prove invaluable when discussing maintenance needs with professionals or documenting issues for insurance claims.
DIY Maintenance Techniques That Prevent Costly Repairs
Safe debris removal starts with the right tools and techniques to protect both you and your roofing materials. For low-slope roofs, use a soft-bristled push broom with an extension handle, working from the peak downward to avoid forcing debris under shingles. For steeper pitches, consider leaf blowers operated from ladder height rather than walking on the surface. Always blow parallel to the roof plane, not directly at shingles which can force debris under the tabs and break sealing strips. For stubborn debris accumulation in valleys, use a garden hose with moderate pressure, again working from top to bottom. Never use pressure washers on any roofing material as the concentrated force can remove protective granules and damage sealants.
Proper gutter cleaning prevents the cascade of problems that begins with poor drainage. Start by removing large debris by hand (wearing puncture-resistant gloves), then flush remaining material with a garden hose. Check downspouts for clogs by running water through them at full pressure—water backing up indicates blockages requiring additional attention. Install gutter guards appropriate for your local tree types—fine mesh systems work well for small debris like pine needles, while open systems suffice for larger leaves. Remember to secure your ladder properly, positioning it on solid ground with the top extending at least three feet above the gutter line for stable transitions. Consider using ladder stabilizers that distribute weight across the gutter system rather than placing pressure on the gutter edge.
Moss removal requires balancing effectiveness with protective measures for your roofing materials. For light moss growth, create a 50/50 mixture of water and white vinegar in a pump sprayer, applying on an overcast day to prevent premature evaporation. Allow the solution to sit for 20-30 minutes before gently loosening moss with a soft brush. For more established growth, mix 1 cup oxygen bleach (not chlorine bleach) with 1 gallon of water, applying similarly. Avoid wire brushes or aggressive scraping that can damage shingle surfaces. After treatment, install zinc or copper strips just below the roof peak—these slowly release metals that inhibit new moss growth when rainwater flows across them. For preventative maintenance, trim overhanging branches to increase sunlight exposure which naturally discourages moss establishment.
Flashing repairs often fall within the capable homeowner's DIY range when addressing minor issues. Inspect flashing around chimneys, vents, and roof transitions for loose sections or deteriorated sealant. For loose flashing that remains in good condition, carefully clean the metal and surrounding area with mineral spirits, then apply a high-quality roofing sealant designed for your specific roofing material. When replacing damaged sections, remove only one small portion at a time to maintain water protection. Use compatible materials—aluminum flashing with aluminum, copper with copper—to prevent galvanic corrosion. Always overlap flashing pieces by at least 2 inches in the direction of water flow and secure with appropriate fasteners, finishing with properly applied sealant at all edges.
Proper attic ventilation dramatically extends roof lifespan by preventing moisture accumulation and reducing heat buildup. Check that existing soffit vents remain unobstructed by insulation by installing baffles that maintain airflow pathways. Verify that ridge or gable vents provide adequate exhaust capacity—as a general rule, you need 1 square foot of ventilation for every 300 square feet of attic floor space, evenly divided between intake and exhaust openings. Consider installing a solar-powered attic fan to enhance air movement during summer months when heat buildup is most severe. During winter, ensure bathroom and kitchen exhaust fans vent directly outside rather than into the attic space where moisture can condense on roof sheathing.
Safely trimming overhanging branches prevents multiple forms of roof damage. Identify branches that come within 10 feet of your roof surface, giving priority to those directly above the structure. For smaller limbs within your reach from a secure ladder position, use bypass pruners that make clean cuts without crushing wood fibers. For larger branches, consider hiring professionals who can safely remove sections without allowing them to fall onto your roof. When doing the work yourself, use proper tree-cutting techniques, including the three-cut method that prevents bark tearing: make an undercut first, then a top cut slightly farther out on the branch, followed by a final cut just outside the branch collar. Schedule this work during dormant seasons when trees are less likely to sustain lasting damage.
Energy Efficiency Connection: How Roof Maintenance Affects Your Bills
Identifying thermal bridges in your roof system can significantly reduce energy waste throughout the year. These areas of heat transfer typically occur where framing members create direct pathways between your living space and the outside environment. During winter months, examine your roof after light snowfall—areas where snow melts faster indicate heat escaping through thermal bridges. From inside, use a thermal camera attachment for your smartphone to identify temperature variations across your ceiling. Pay special attention to areas around recessed lighting, attic access hatches, and where partition walls meet the ceiling. Addressing these weak points with targeted insulation can reduce heating costs by up to 15% in older homes.
The relationship between your roof's surface condition and energy costs extends beyond just color selection. While light-colored "cool roofs" can reduce summer cooling costs by up to 20% compared to dark roofs, maintaining any roof's cleanliness provides similar benefits. Accumulated dirt, algae, and debris significantly reduce reflectivity even on light-colored surfaces. Regular gentle cleaning restores this reflective capacity without damaging materials. For asphalt shingles showing black streaks from algae growth, applying a 50/50 mixture of water and white vinegar helps restore reflectivity without harsh chemicals. Consider that even dark-colored roofs can achieve better energy performance when maintained properly and paired with adequate ventilation.
Attic insulation inspection reveals opportunities for simple improvements with substantial energy returns. Check your current insulation depth against Department of Energy recommendations for your climate zone—most homes benefit from R-38 to R-60 ratings. Look for compressed areas, particularly around the attic perimeter where roof angles limit space, as compressed insulation loses effectiveness. Address gaps around fixtures and penetrations with foam sealant designed for these applications. For homes with older insulation, consider adding an unfaced layer perpendicular to existing batts to increase R-value without creating vapor barrier problems. Focus especially on sealing and insulating the attic access point, which often creates a significant thermal break in an otherwise well-insulated ceiling.
Proper ventilation creates a dual benefit by preventing both winter ice dams and summer heat buildup. In winter, inadequate ventilation allows heat from your living space to warm the roof surface unevenly, melting snow that later refreezes at the eaves. This cycle creates destructive ice dams that force water under shingles. During summer, poor ventilation can elevate attic temperatures to over 150°F, transferring heat to living spaces and causing premature aging of roofing materials. Verify that your roof has both sufficient intake ventilation (typically through soffit vents) and exhaust ventilation (through ridge or gable vents). The balanced system should provide continuous air movement that maintains temperatures close to the outdoor ambient level.
Calculating the return on investment for preventative maintenance creates compelling financial motivation. Consider that basic DIY maintenance costs typically range from $100-200 annually for materials, while professional roof replacements average $8,000-$15,000 depending on size and materials. A properly maintained asphalt shingle roof can last 25-30 years versus 15-18 years for a neglected one. Beyond these direct costs, energy waste from a compromised roof system can add $20-40 monthly to utility bills. When factoring these combined expenses, consistent maintenance provides approximately 300% return on investment over the roof's lifespan. This calculation doesn't even include potential water damage to interior finishes and structural elements, which can easily exceed the cost of the roof itself.
When to Call the Professionals: Recognizing Your Limitations
Safety assessment must precede any DIY roof maintenance task, with honest evaluation of both the roof's condition and your personal capabilities. Consider roof pitch as a primary factor—slopes greater than 4:12 (rising 4 inches for every horizontal foot) significantly increase fall risks and require specialized equipment and training. Evaluate your physical condition realistically; balance issues, medication side effects, or health conditions that affect coordination make roof work particularly hazardous. Weather conditions create additional variables—never attempt roof work in windy, wet, or extremely hot conditions that compromise stability and judgment. Remember that even professional roofers experience accidents despite extensive training and equipment. When in doubt, the cost of professional service always remains lower than potential medical expenses.
Certain red flags demand immediate professional intervention regardless of your DIY comfort level. Water stains on ceilings that expand noticeably during rainfall indicate active leaks requiring prompt attention before structural damage occurs. Multiple missing or damaged shingles, particularly in concentrated areas, suggest underlying issues beyond simple replacement. Sagging roof sections indicate potential structural compromise that requires expert assessment of roof decking and supporting rafters. Granule accumulation that fills gutter channels rather than appearing in small amounts signals advanced shingle deterioration. Any visible daylight through the roof when viewed from inside the attic represents a critical failure requiring professional repair before the next precipitation.
Building a relationship with a trusted roofing professional provides benefits beyond emergency repairs. Seek contractors who offer maintenance programs rather than just replacement services, demonstrating their commitment to roof longevity. Look for professionals willing to perform thorough inspections and provide detailed written reports rather than quick visual assessments. The best roof professionals educate homeowners about specific maintenance needs for their particular roofing system and climate conditions. Consider scheduling professional inspections every 2-3 years even when no obvious problems exist—these preventative evaluations often identify developing issues before they create noticeable damage, saving substantial repair costs.
When seeking professional evaluations, ask specific questions that demonstrate your engagement and help identify truly knowledgeable contractors. Request detailed explanations of how your particular roof type ages in your specific climate rather than accepting generic assessments. Ask about the expected remaining service life of different roof components—flashings often fail before shingles, for example. Request photographs of any identified problems rather than relying solely on verbal descriptions. Question whether identified issues require immediate attention or can be monitored through regular maintenance. Ask what specific preventative measures would provide the greatest benefit for your particular roof configuration and local weather challenges.
Creating a long-term maintenance partnership with roofing experts establishes a proactive approach to roof care. The most effective arrangements combine professional expertise with homeowner vigilance. Discuss establishing a documented baseline of your roof's current condition, including photographs and written assessment. Develop a customized maintenance calendar that specifies which tasks you'll handle personally and which require professional skills. Consider scheduling professional gutter cleaning and inspection services in late fall when ladder work becomes more hazardous due to cold, wet conditions. Request that your roofing partner provide educational resources specific to your roof type rather than generic advice. This collaborative approach maximizes both roof performance and your maintenance investment.
Conclusion: Protecting Your Investment Through Proactive Roof Care
Your roof isn't just another home component—it's a critical shield protecting everything beneath it. The difference between replacing your roof every 15 years versus enjoying 30 years of reliable protection often comes down to consistent, informed maintenance rather than the materials themselves. By implementing seasonal inspection strategies, recognizing early warning signs, performing appropriate DIY maintenance, and knowing when to call professionals, you're not just extending your roof's lifespan—you're safeguarding your entire home while significantly reducing energy costs. The comprehensive approach outlined in this guide empowers you to balance time investment with substantial financial returns.
Remember that roof maintenance isn't about perfection; it's about persistence and prevention. Each small effort compounds over time, transforming what might have been costly emergency repairs into manageable routine care. Your roof silently endures everything nature throws at it, asking little in return except occasional attention. The next time you're comfortable in your home during a storm, consider the barrier that makes that comfort possible—then ask yourself what you've done lately to return the favor. After all, in the relationship between you and your roof, a little care today prevents a flood of regrets tomorrow.