Your roof is your home's first line of defense against the elements, yet most homeowners only think about it when something goes wrong. A small leak can quickly turn into thousands of dollars in damage, but many issues can be spotted early with regular inspections. While professional roofers have the training and equipment for comprehensive evaluations, you can identify many warning signs yourself with some basic knowledge and careful observation.
What's really happening beneath those shingles or tiles? Could that water stain on your ceiling be connected to the tree branches touching your roofline? Throughout this guide, we'll walk you through a systematic approach to examining your roof's condition—from safely setting up your ladder to documenting changes over time. You'll learn to spot subtle warning signs that most homeowners miss and understand when a professional assessment becomes necessary. With these skills, you'll be better equipped to protect one of your home's most valuable components.
Preparing for Your Roof Inspection: Safety and Tools
Safety should always be your primary concern when conducting a DIY roof inspection. Even the most straightforward inspection can become dangerous without proper precautions. Before you even think about climbing a ladder, ensure it's in good working condition with no loose rungs or wobbling. Position your ladder on solid, level ground and have someone spot you if possible. The ladder should extend at least three feet beyond the roof edge, providing a secure handhold when stepping onto and off the roof.
Wearing appropriate footwear is non-negotiable—opt for shoes with soft rubber soles that provide good traction on sloped surfaces. Avoid inspections during windy, rainy, or icy conditions, as these significantly increase fall risks. For steep roofs or those with multiple stories, consider using binoculars from ground level or hiring a professional rather than risking personal safety. Remember that no roof inspection is worth a trip to the emergency room.
The right tools can make your inspection more thorough and efficient. While you don't need professional-grade equipment, a basic kit should include:
- A powerful flashlight for examining dark corners and attic spaces
- Binoculars for viewing distant roof sections without climbing
- A smartphone or camera to document findings for future reference
- A moisture meter (available at hardware stores) to detect dampness that isn't visibly apparent
- A simple notebook or digital app for recording observations
- A basic measuring tape for documenting the size of damaged areas
Developing a systematic inspection plan prevents overlooking critical areas. Sketch a simple diagram of your roof and divide it into sections. Work methodically from one section to the next, checking each component thoroughly before moving on. This approach ensures comprehensive coverage and provides a framework for documenting specific issues by location. The best time to conduct your inspection is during mild, overcast days when glare is minimal, and temperatures are comfortable. Avoid inspecting immediately after heavy rainfall when water may still be present but not necessarily indicating active leaks.
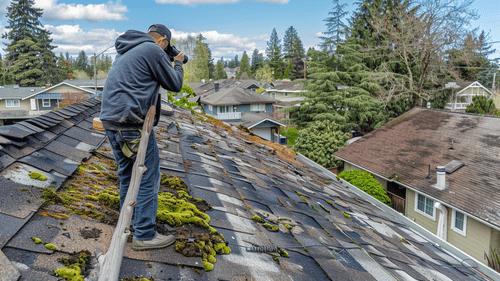
Exterior Warning Signs: Beyond the Obvious Drips
Water infiltration often manifests in subtle ways before developing into obvious leaks. Examine your roof's exterior carefully for signs of wear that might not be immediately apparent. Curling, cracked, or missing shingles indicate deterioration that compromises your roof's water-shedding capability. Pay special attention to shingles with granules missing—these protective particles wash into gutters over time, signaling the end of a shingle's effective lifespan. Dark streaks or algae growth, while primarily aesthetic concerns, can accelerate deterioration by retaining moisture against roofing materials.
Roof edges and transition areas require particular scrutiny as they're especially vulnerable to water penetration. Inspect all flashing—the metal strips covering joints around chimneys, vents, and where roof planes meet—for signs of rust, separation, or missing pieces. Valleys where two roof slopes intersect collect significant water during rainfall and are prone to accelerated wear. Look for damaged or missing valley materials and accumulated debris that can trap moisture and cause premature deterioration. Sealants around roof penetrations like vents and pipes often crack and deteriorate faster than surrounding roofing materials, creating entry points for water.
Gutters and downspouts play a crucial role in roof health by directing water away from your home. Clogged or damaged gutters can cause water to back up onto the roof edge, potentially forcing water under shingles and into your home. Ensure gutters are firmly attached, sloped properly toward downspouts, and free of debris. Downspouts should extend at least five feet from your foundation or connect to underground drainage systems. As noted in our supporting materials, ground sloping toward the house combined with downspouts emptying next to walls creates ideal conditions for foundation problems and basement water issues. Proper grading should direct water away from your home's perimeter at a slope of at least one inch per foot for the first ten feet from the foundation. This seemingly minor detail can prevent major structural issues that often begin with improper water management around your home's exterior.
Interior Detection: Tracing Leaks to Their Source
Interior leak detection requires patience and methodical investigation. When you spot water dripping from the ceiling or walls during or after rainfall, remember that water often travels significant distances from its entry point before becoming visible. Begin your investigation in the attic, directly above the visible leak. As our supporting materials note, you should "start your search" above the leak in the ceiling and "look for moisture or signs of moisture on the roof truss or insulation above it." Bring a powerful flashlight and examine roof sheathing (the wood panels supporting your roofing materials) for dark stains, mold, or wet spots. Water stains on wood typically appear darker than surrounding materials and may feel damp to the touch.
Insulation provides valuable clues about leak locations and duration. Compressed or discolored insulation indicates water has been present for some time. Remove and replace any wet insulation, as it loses its thermal efficiency when damp and can harbor mold. While in the attic, examine roof trusses and rafters for water stains that track along wood members. Water typically follows the path of least resistance, traveling along structural elements before dripping onto insulation or ceilings below. Pay special attention to areas around roof penetrations such as vents, chimneys, and exhaust fans, as these frequently develop leaks at their perimeters.
Natural light can be your most powerful inspection tool in the attic. During daylight hours, turn off your flashlight periodically and look for pinpoints of light coming through the roof—these indicate holes that can allow water entry. Even tiny openings can admit substantial water during driving rain. Water stain patterns provide valuable information about leak severity and history. Fresh leaks appear as wet spots with distinct edges, while older leaks typically show yellowish or brownish discoloration with less defined boundaries. Concentric rings or "tide marks" on ceiling stains suggest a leak that has occurred multiple times, with each ring representing a separate event. These patterns help determine whether you're dealing with an active, ongoing leak or residual staining from a previously repaired issue.
Environmental Factors: External Influences on Roof Integrity
Trees provide shade and enhance property aesthetics but can significantly impact roof longevity. Overhanging branches create multiple problems: they drop leaves and needles that retain moisture against roofing materials, provide pathways for pests like squirrels and raccoons to access your roof, and risk damaging shingles or puncturing roofing during storms. Maintain at least 10 feet of clearance between tree limbs and your roof surface. During your inspection, look for telltale signs of branch abrasion on shingles—scuffed areas where protective granules have been worn away by branches moving in the wind.
Drainage patterns around your home directly affect both roof and foundation health. Walk your property during rainfall to observe how water moves across the landscape. Areas where water pools near the foundation indicate grading issues that need correction. Poor drainage at ground level can contribute to basement moisture problems that are often mistakenly attributed to roof leaks. Remember that water management is a whole-house system—from roof to foundation—and problems in one area often manifest in another. Creating proper slope away from the foundation, installing underground drain pipes from downspouts, and maintaining clear gutters work together to protect your entire structure.
Regional weather patterns create specific concerns that should guide your inspection focus. In snow-prone regions, look for signs of ice dam formation along roof edges—these occur when heat escaping from the home melts snow, which then refreezes at the colder roof edge, creating a barrier that forces water under shingles. Hurricane-prone areas should focus on securing roof edges and ensuring all flashing is properly installed and sealed, as these areas experience the greatest wind pressure during storms. In hot, sunny climates, examine roofing for signs of heat damage like excessive granule loss, blistering, or cracking shingles. Adjacent structures like sheds or detached garages built close to the main house can create problematic drainage situations where water from multiple roofs concentrates in a small area. Ensure adequate spacing between buildings or install appropriate drainage solutions to manage combined runoff effectively.
Documentation and Monitoring: Creating Your Roof Health Record
Establishing a simple documentation system transforms occasional inspections into a powerful preventative maintenance tool. Create a dedicated digital folder or physical binder for your roof records, including the original installation date, warranty information, and all maintenance or repair history. After each inspection, record the date, weather conditions, and specific observations about roof condition. This historical record allows you to track gradual changes that might otherwise go unnoticed and provides valuable information for professionals when repairs become necessary.
Photographic documentation provides objective evidence of roof conditions over time. Take clear, well-lit photos of your entire roof during each inspection, capturing overall views and close-ups of potential problem areas. Use consistent angles and perspectives to facilitate meaningful comparisons between inspections. Digital time stamps and organization by date create an easily referenced visual history. Consider marking reference points on your roof diagram and photographing these same locations during each inspection. This practice allows you to monitor specific areas of concern and detect subtle changes that might indicate developing problems.
Develop a maintenance calendar tailored to your specific roof type, age, and local climate conditions. Most asphalt shingle roofs benefit from inspection twice yearly—typically in spring and fall—while tile, metal, or slate roofs may require less frequent checks. Schedule additional inspections after major weather events like hailstorms, high winds, or heavy snow loads that could cause damage. When professional service becomes necessary, your documentation provides invaluable context for roofing contractors. Rather than relying solely on a single-point assessment, you can share your observation history, helping professionals understand how issues have developed over time. This information often leads to more accurate diagnoses and appropriate repair recommendations. Should you ever need to file an insurance claim for roof damage, your documentation establishes a timeline that can help demonstrate whether damage resulted from a specific covered event or gradual deterioration, potentially making the difference between claim approval or denial.
Conclusion: Taking Ownership of Your Roof's Future
Your roof silently protects everything you value beneath it, yet it's often overlooked until problems emerge. By implementing the systematic inspection approach outlined in this guide—from safety preparations and exterior examinations to interior investigations and documentation—you're now equipped to detect small issues before they become costly disasters. Remember that effective roof maintenance isn't a one-time event but an ongoing relationship with one of your home's most critical components. The documentation system you've established transforms occasional observations into a powerful preventative tool that tracks your roof's health over time.
Regular inspections empower you with knowledge that saves money, extends roof life, and provides peace of mind during severe weather. When professional help becomes necessary, your detailed records will ensure more accurate assessments and appropriate solutions. While your roof may not be the most glamorous home improvement project, it's certainly among the most consequential. After all, what good are beautiful interiors if water damage destroys them? Your vigilance today determines whether tomorrow brings an unexpected emergency or another year of reliable protection for everything that matters beneath those shingles.